What is Portainer?
Portainer is a lightweight management UI that allows you to easily manage your Docker host or Kubernetes Clusters. Portainer is as simple to deploy as it is to use.
It allows anyone to deploy and manage containers without the need to write code.
Portainer can be used to set up and manage an environment, deploy applications, monitor application performance, and spot problems easily.
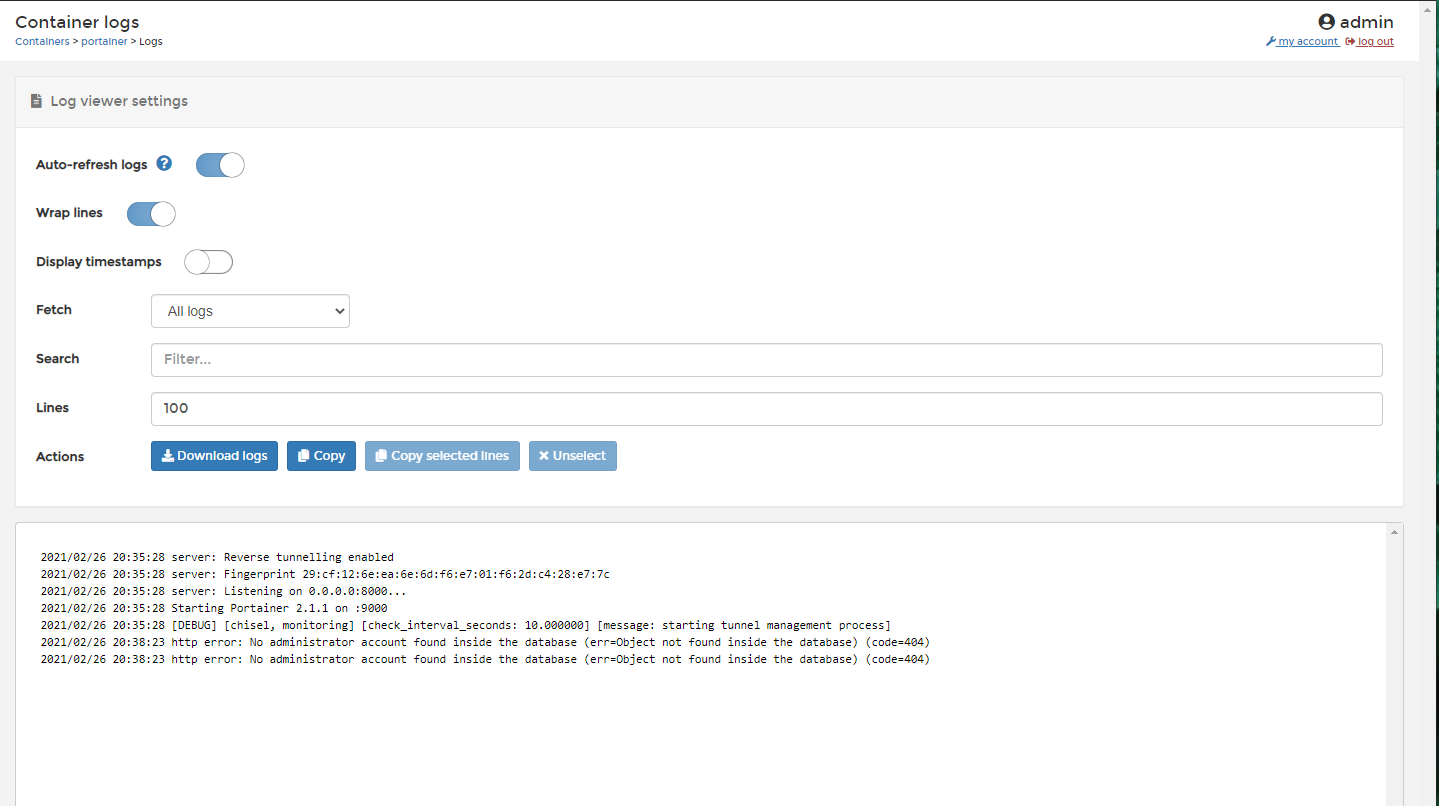 Portainer showing Docker container logs
Portainer, as a whole, is a self-hostable, open-source, container management system. Giving you complete visual control over your Docker instances. With Image management, restart policies and usage logs.
Portainer showing Docker container logs
Portainer, as a whole, is a self-hostable, open-source, container management system. Giving you complete visual control over your Docker instances. With Image management, restart policies and usage logs.
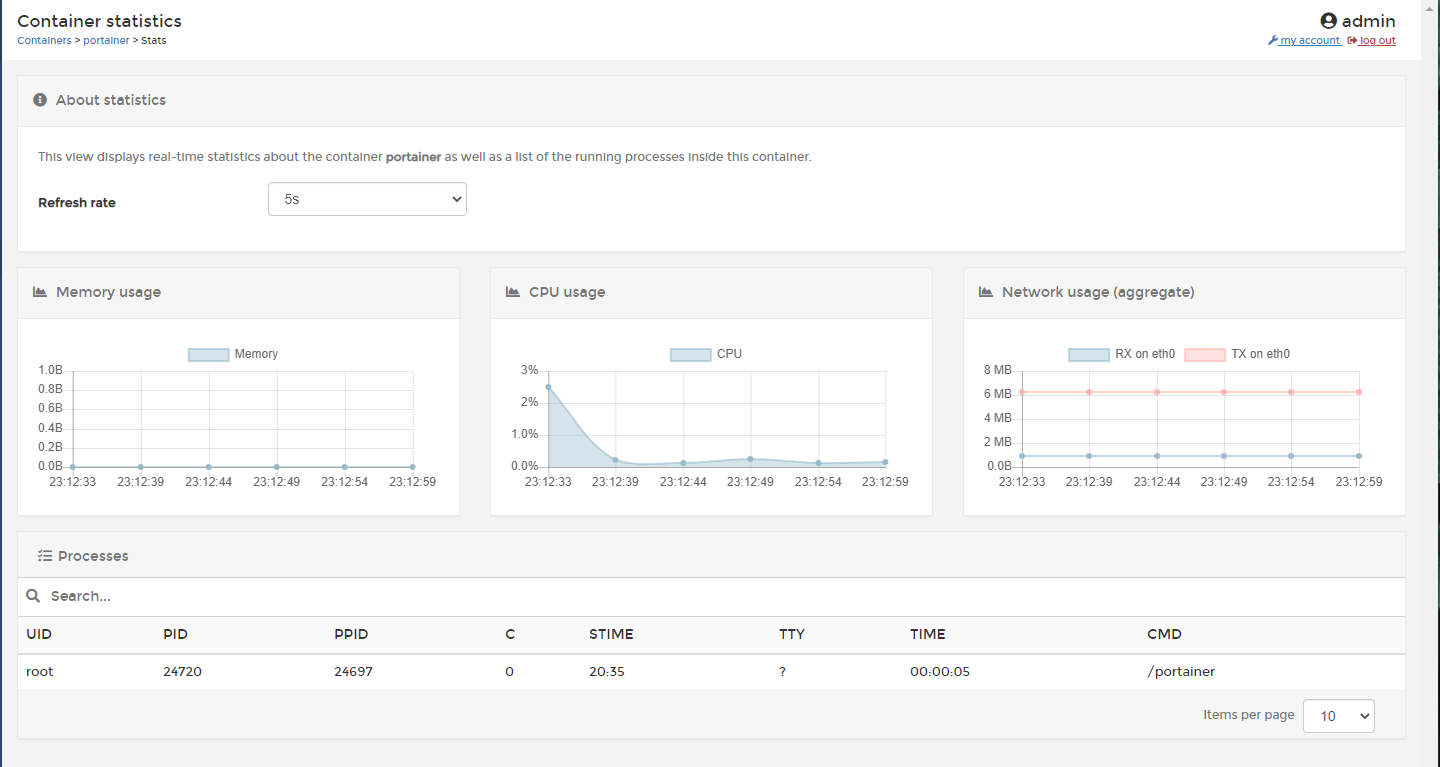 Portainer showing usage statistics for a Docker container
Installing Portainer
Prerequisites: Provisioning your server
You’ll need to either purchase something like a Raspberry Pi or use an existing server at your disposal.
I use a Proxmox instance running on a server in my loft.
You could also use something like Digital Ocean to run your Docker server, Using the following link will give you $100 worth of credits for 60 days to play around with, just sign up using this link.
If you are using Digital Ocean, be sure to follow our tutorials on locking down your exposed ports with UFW and setting up a Wireguard VPN to ensure that your Digital Ocean endpoints are protected.
Step 1: Installing Docker on your server
All of the following instructions are based on the Debian distro, so if you’re running a server with Ubuntu, these instructions will be perfect for you. If not, you may have to adjust the commands below to suit your distro.
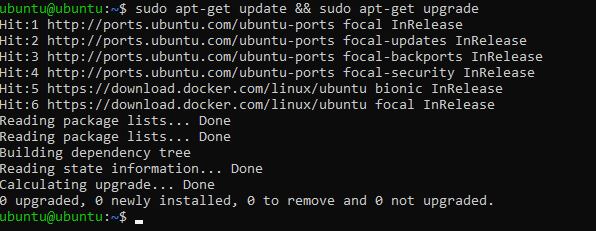
The first step is to just make sure our server is up to date. Run the following commands to pull down the latest updates from our distro repositories.
sudo apt-get update && sudo apt-get upgrade
You should see an output like the following
 Console output for running the update and upgrade commands
Next, we need to install Docker. Docker is the layer which your containers run. Portainer is a UI that sits upon Docker to assist with container management.
Console output for running the update and upgrade commands
Next, we need to install Docker. Docker is the layer which your containers run. Portainer is a UI that sits upon Docker to assist with container management.
To install Docker on your instance, you need to run the following command.
The following script is a convenience script provided by the Docker team. It’s highly recommended to always check what you’re going to execute, before executing it.
curl -fsSL https://get.docker.com -o get-docker.sh
sudo sh get-docker.sh
Installing Docker using the convenience script
Once you have executed the Docker install script. You should see an output like the following.
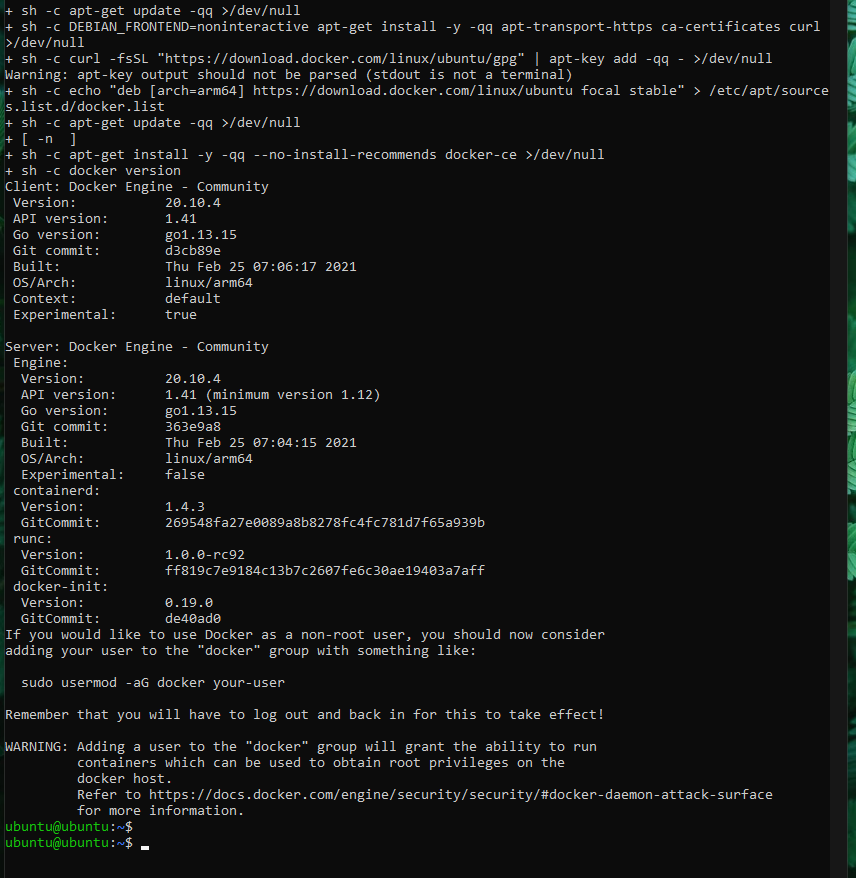 Docker convenience script install output
As you can see in the output, the command was executed successfully. You may also notice that there is a console message specifying how to use Docker as a non-root user.
Docker convenience script install output
As you can see in the output, the command was executed successfully. You may also notice that there is a console message specifying how to use Docker as a non-root user.
This means that whenever you are executing the Docker command, you’ll no longer need to type in your sudo password.
If this sounds good to you, you can simply run the provided command, substituting your-user for your server user. In my case, my user is ubuntu. My command would look like this.
sudo usermod -aG docker ubuntu
Adding your user to the Docker group
Step 2: Installing Portainer
It’s now time to install Portainer on our Ubuntu instance.
The first step to installing Portainer is to create a persistent volume within Docker.
This means that whenever we shut down our Docker container or reboot our server. All the data associated with Portainer is persisted. Meaning it’ll save our data and spin back up.
To do this, we need to execute the following command.
docker volume create portainer_data
Creating the Portainer volume
Your output will simply be the following.
 Output for creating persistent storage for Portainer in Docker
Next, we just need to run the Docker command to pull down the latest Portainer image and spin up our container.
Output for creating persistent storage for Portainer in Docker
Next, we just need to run the Docker command to pull down the latest Portainer image and spin up our container.
docker run -d -p 8000:8000 -p 9000:9000 --name=portainer --restart=always -v /var/run/docker.sock:/var/run/docker.sock -v portainer_data:/data portainer/portainer-ce
The Docker Run script for Portainer If you’re new to Docker, this command may look quite confusing to you. Which is part of the business model of Portainer. Portainer takes the complications out of spinning up Docker containers.
The following command configures:
- The mode in which the Docker command will run in (detached)
- The port/s specified to run the container on (8000 and 9000)
- The name of the container (Portainer)
- The restart policy (Whether or not to spin the container back up if we restart or manually stop the service)
- The mount points for the Container and our host machine
- And finally the image we are going to use to run our Container (portainer/portainer-ce)
All of this is a single command, confusing right?
Anyway, let’s execute the command to spin up Portainer.
 The output of running the Docker run command for Portainer
Because we’re running in detached mode, we can’t see much output other than a Container hash.
The output of running the Docker run command for Portainer
Because we’re running in detached mode, we can’t see much output other than a Container hash.
To see some more detail, let’s run a command to show all of our running Docker containers.
docker ps
Running Docker ps The output of running docker ps
Here we can see that our Container has started correctly, and is running on the ports that we configured.
The output of running docker ps
Here we can see that our Container has started correctly, and is running on the ports that we configured.
Let’s now go to our browser and log in to Portainer using the GUI.
To navigate to Portainer, you need to enter your servers’ IP address into the URL bar of your web browser. Followed by :9000
In my case, my server is running on 192.168.1.4
So I would type in http://192.168.1.4:9000
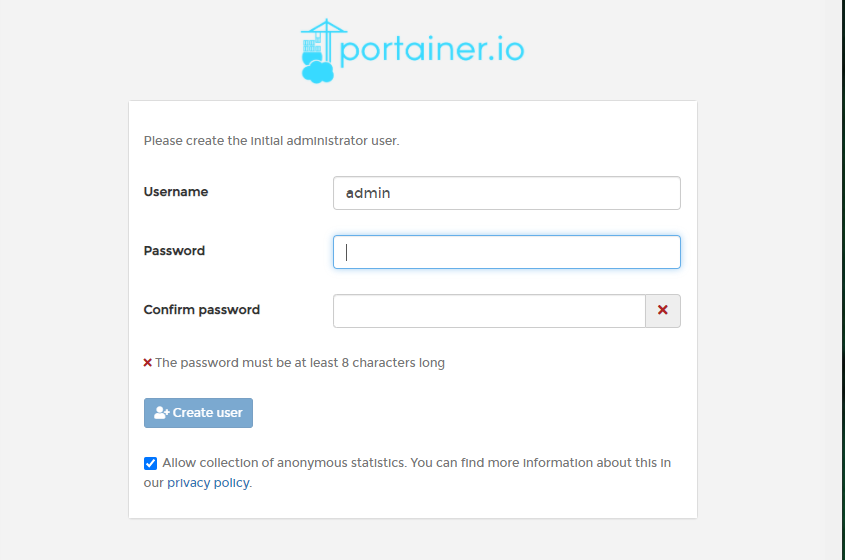 The Portainer initial page
Once you have hit the Portainer configuration screen, you should be able to enter a Username and Password. Once done, click
The Portainer initial page
Once you have hit the Portainer configuration screen, you should be able to enter a Username and Password. Once done, click Create user.
Next, you’ll see a screen that looks like the following.
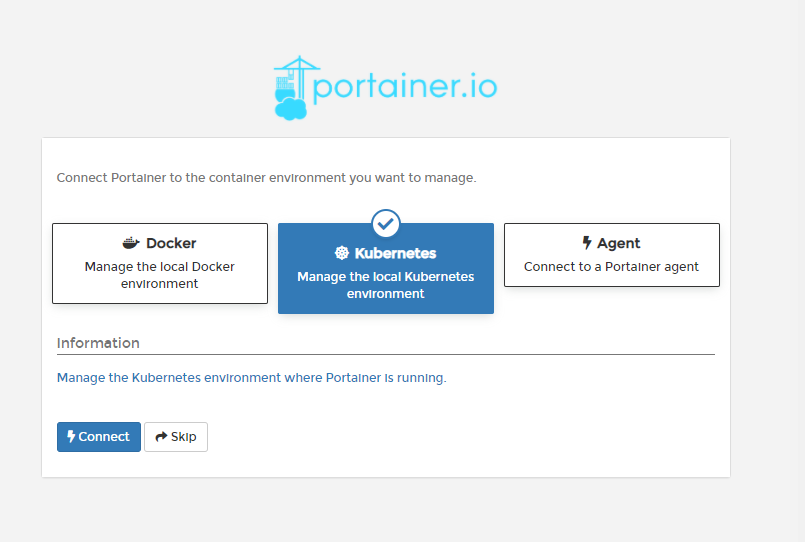 Configuring Portainer to use Docker over Kubernetes
By default, Kubernetes is selected. Kubernetes is something for another blog post. For now, we’re going to select Docker.
Configuring Portainer to use Docker over Kubernetes
By default, Kubernetes is selected. Kubernetes is something for another blog post. For now, we’re going to select Docker.
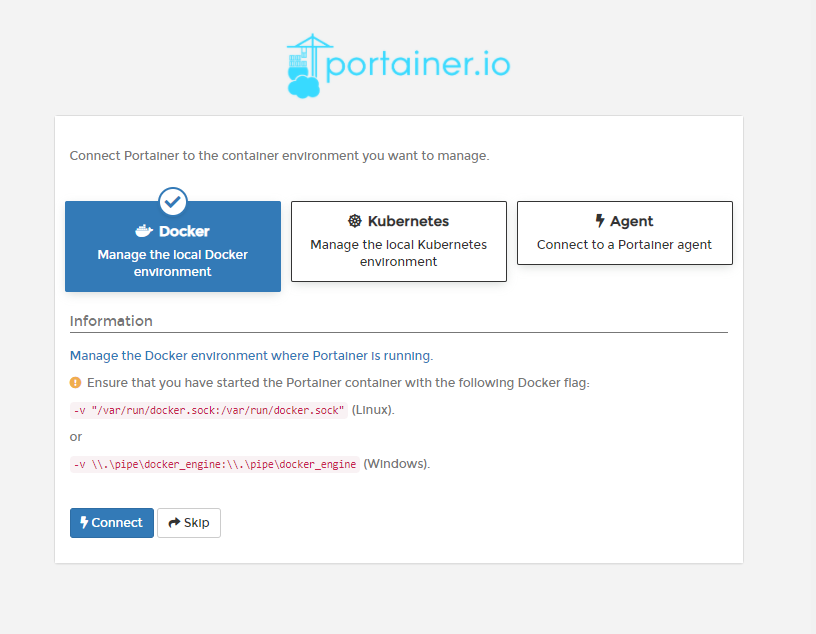 Selecting Portainer to use Docker
We can now hit
Selecting Portainer to use Docker
We can now hit Connect.
Once done, you should be able to see the following screen.
 The Portainer Dashboard
Congratulations, Portainer is installed!
The Portainer Dashboard
Congratulations, Portainer is installed!
Let’s take a look around
What’s where?
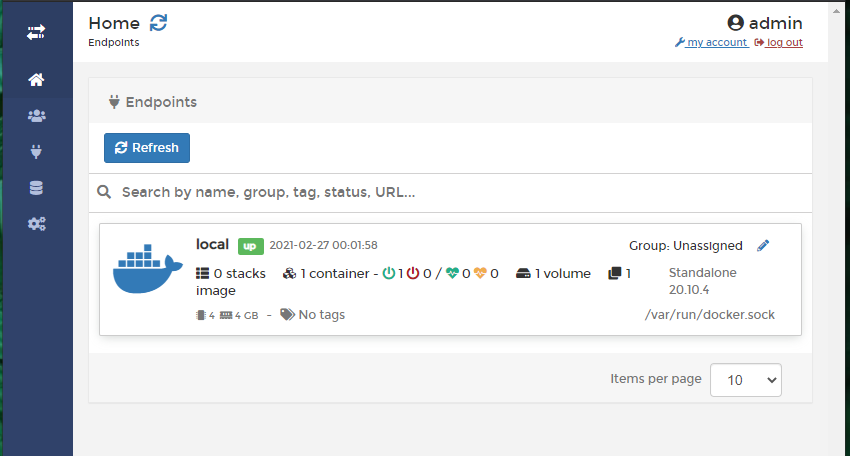
So, first off. Let’s dive into our local endpoint (you can configure remote Docker instances to manage with Portainer).
Click on the box with local.
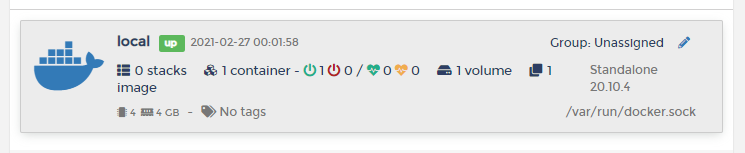 The Portainer local endpoint
This will take you to the Endpoint summary for your endpoint.
The Portainer local endpoint
This will take you to the Endpoint summary for your endpoint.
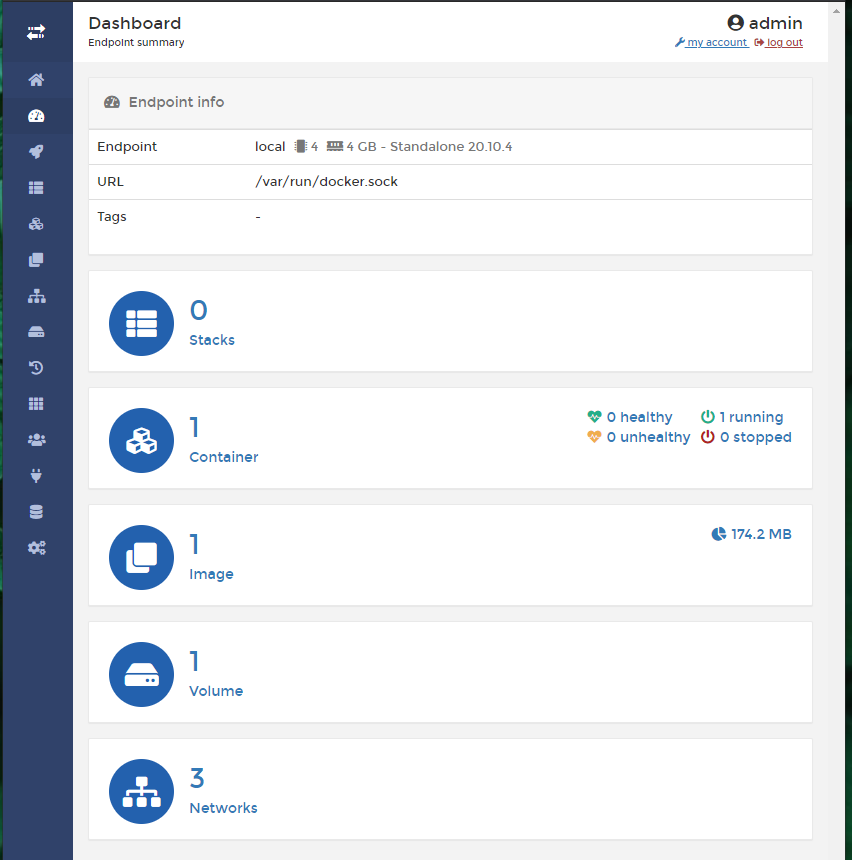 The Portainer Endpoint summary
As you can see, we have 1 Container, 1 Image and 1 Volume already running. Can you guess why?
The Portainer Endpoint summary
As you can see, we have 1 Container, 1 Image and 1 Volume already running. Can you guess why?
That’s right! (probably), Portainer is showing us the Portainer Docker instance which is running on our machine. This is because Portainer is just a fancy wrapper around the Docker service.
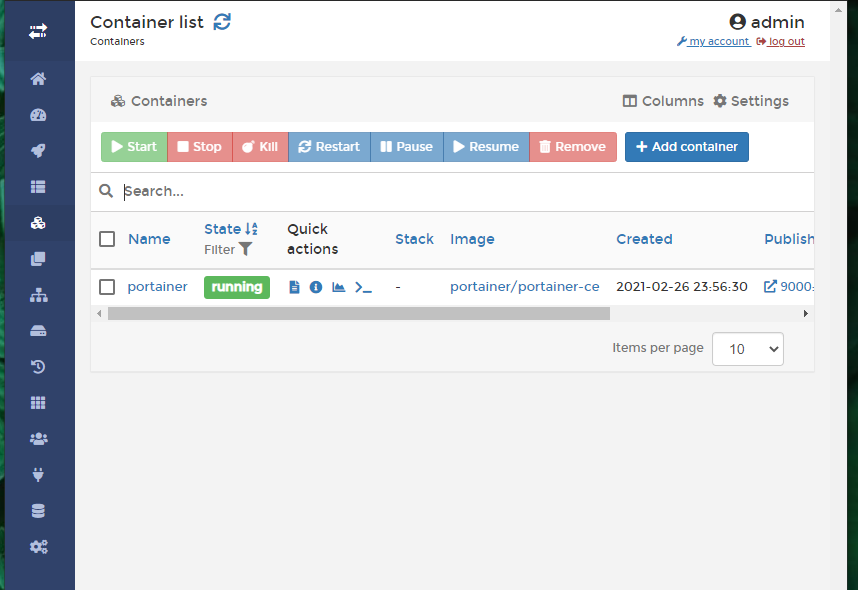 The Portainer Container list
Creating a new container
We’ve recently posted about how to self-host PiHole, so I figured it would be a good idea to show you how to set up PiHole via Portainer.
Firstly, let’s create a new container by clicking the button on the top row.
 Add container button
You’ll be greeted with the Create container dashboard.
Add container button
You’ll be greeted with the Create container dashboard.
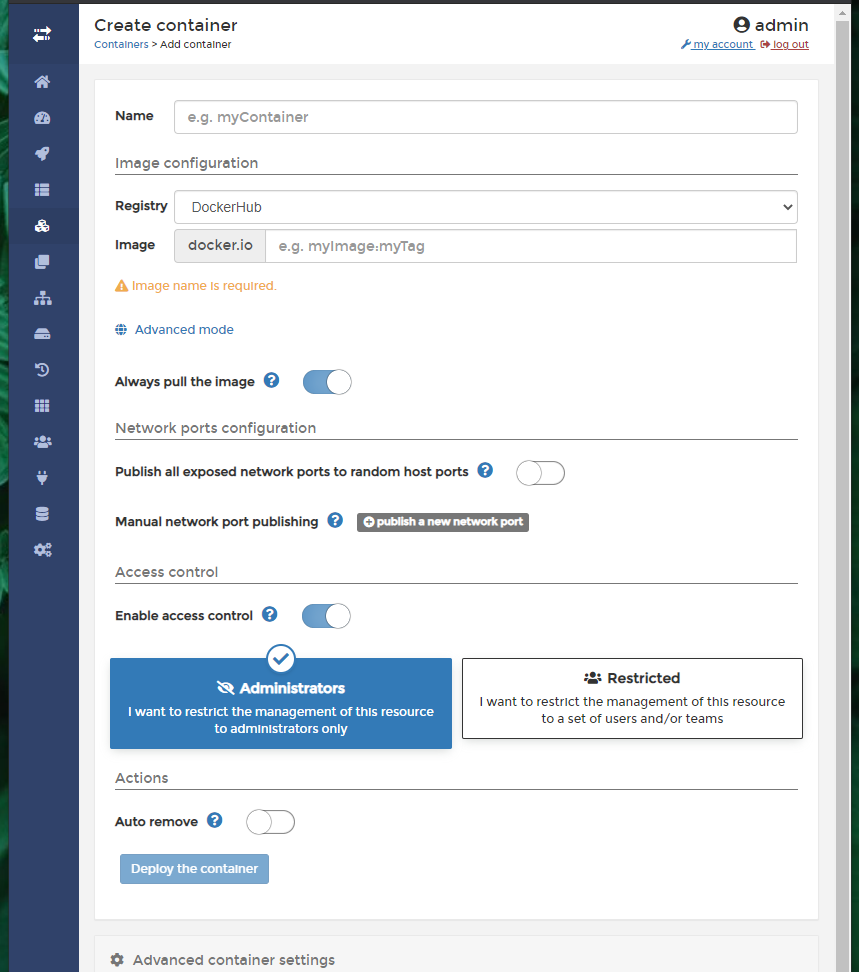 The Portainer Create container dashboard
Let’s start with a name that we want to give our Container. As I mentioned before, I’m going to be using PiHole as our example.
The Portainer Create container dashboard
Let’s start with a name that we want to give our Container. As I mentioned before, I’m going to be using PiHole as our example.
I’m going to call mine PiHole.
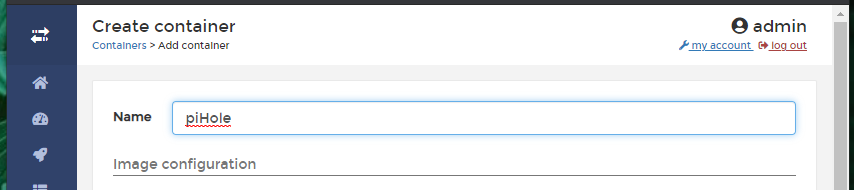 Create container name field
Next, we need to find the PiHole image from the DockerHub registry. Navigate to https://hub.docker.com/ and search for PiHole. You should come across the following page.
Create container name field
Next, we need to find the PiHole image from the DockerHub registry. Navigate to https://hub.docker.com/ and search for PiHole. You should come across the following page.
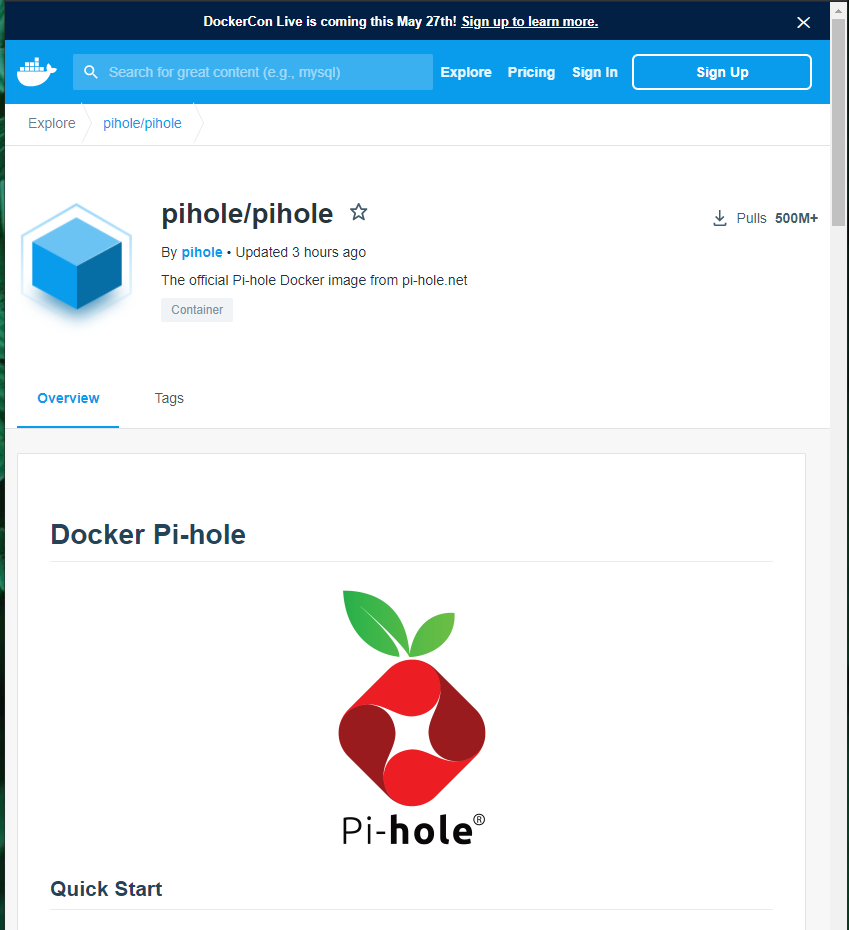 DockerHub page for PiHole
Near the top, you’ll see
DockerHub page for PiHole
Near the top, you’ll see pihole/pihole. This is our image name. Take a copy and switch back to the Portainer screen.
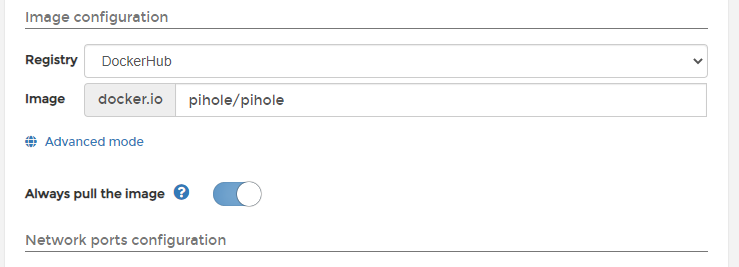 Image configuration for Create container
Paste in the image name and scroll down to the
Image configuration for Create container
Paste in the image name and scroll down to the Network ports configuration.
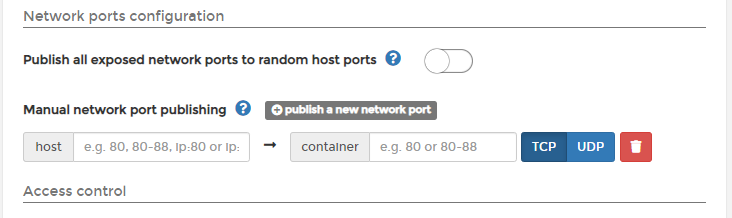 Port mapping
We need to publish some ports according to the PiHole documentation. Don’t worry, this isn’t exposing to the internet. When a Docker container is running, it’s almost like a black box, where nothing can get in or out unless we explicitly allow it to. So when we expose ports, we’re allowing our host machine the ability to communicate with the Docker Container.
Port mapping
We need to publish some ports according to the PiHole documentation. Don’t worry, this isn’t exposing to the internet. When a Docker container is running, it’s almost like a black box, where nothing can get in or out unless we explicitly allow it to. So when we expose ports, we’re allowing our host machine the ability to communicate with the Docker Container.
Flipping back to the DockerHub page, we can see some port requirements for PiHole
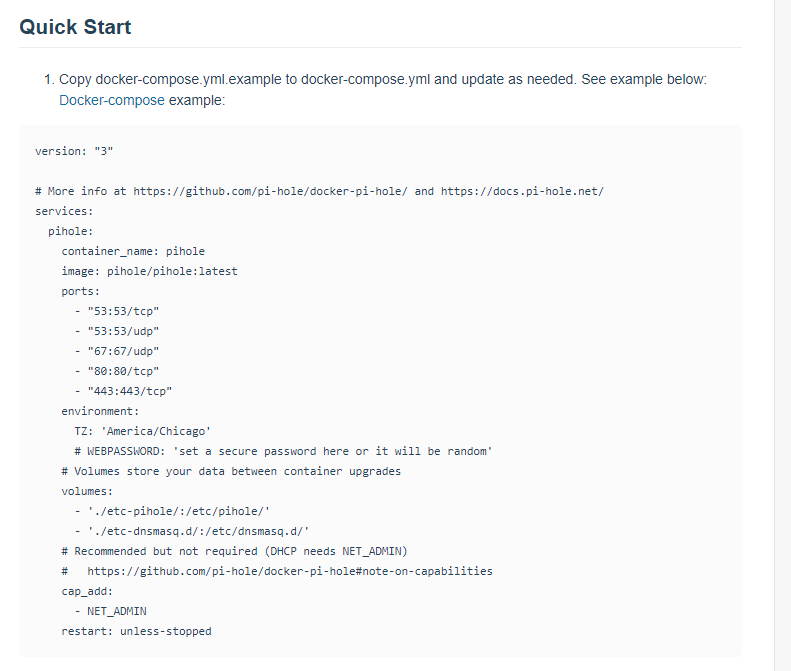 PiHole configuration specifications
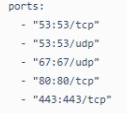 PiHole required ports
We need to add each one of these ports to our Portainer config. The left-hand side of the colon
PiHole required ports
We need to add each one of these ports to our Portainer config. The left-hand side of the colon : is our host machine port. The right-hand side is the port that the Docker Container is running this service on. We are mapping our port, to the container port.
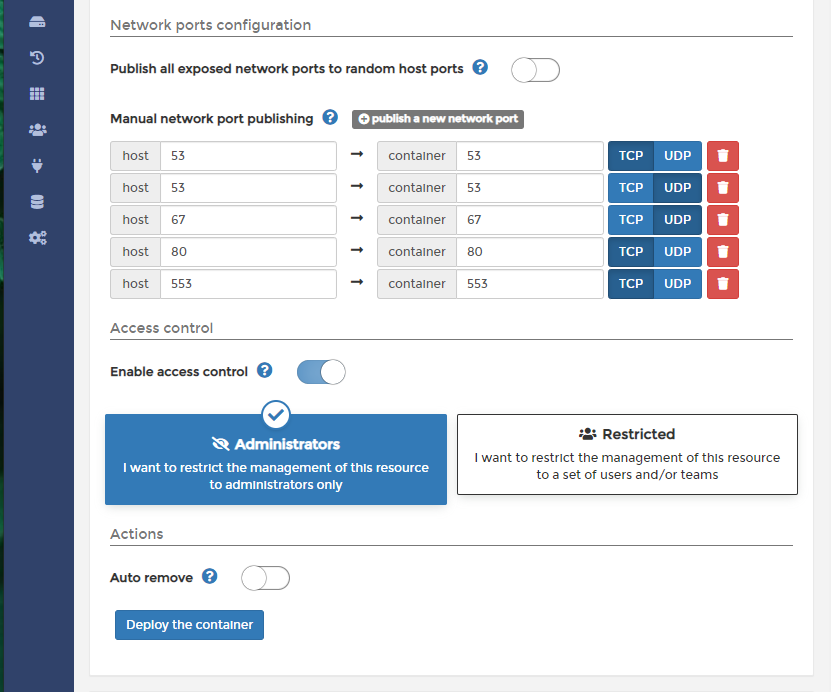
Once you’ve added your ports in Portainer, it should look something like this.
We can ignore the 53 ports.
 Portainer port mapping
Now, let’s scroll all the way to the bottom of the page to
Portainer port mapping
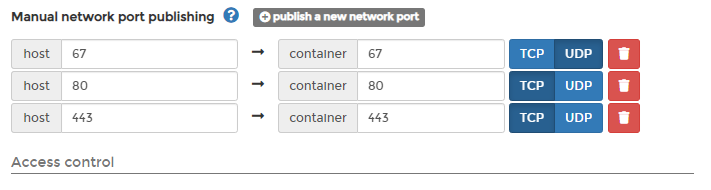
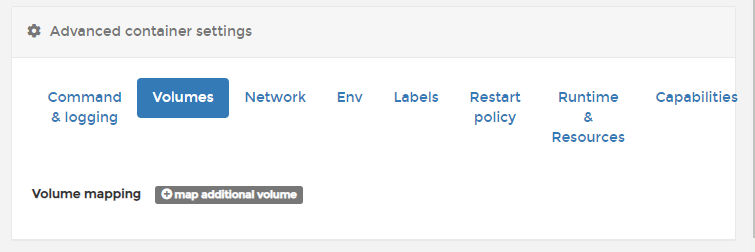
Now, let’s scroll all the way to the bottom of the page to Advanced container settings.
 Portainer advanced container settings
Looking back at the PiHole quickstart on DockerHub, it doesn’t look like we need to configure anything on this tab.
Portainer advanced container settings
Looking back at the PiHole quickstart on DockerHub, it doesn’t look like we need to configure anything on this tab.
Let’s click on the Volumes take to configure some persistent data.
 Portainer volume mapping
The PiHole specification requires us to add the following volumes.
Portainer volume mapping
The PiHole specification requires us to add the following volumes.
 Again, the left-hand side of the colon
 : is our host machine, the right-hand side is the Docker Container.
Click map additional volume then make sure that you click Bind.
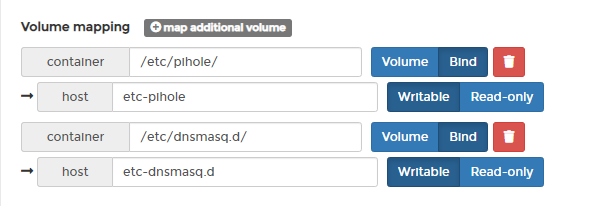 Portainer volume mapping
Now, we can skip the Network tab and move over to the Env tab. This is where we configure the Environment Variables for the Container.
Portainer volume mapping
Now, we can skip the Network tab and move over to the Env tab. This is where we configure the Environment Variables for the Container.
Once again, checking the PiHole requirements.
 PiHole environment variable specifications
You’ll see that
PiHole environment variable specifications
You’ll see that WEBPASSWORD is commented out here. We’re going to specify one to save time changing our password from a randomly generated one later.
You know the drill.
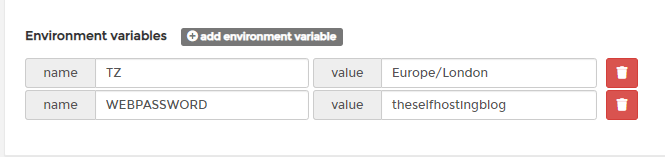 Portainer environment variable mapping
Finally, let’s set our Restart policy to Always. This is so that if we ever reboot our server, PiHole will spin back up.
Portainer environment variable mapping
Finally, let’s set our Restart policy to Always. This is so that if we ever reboot our server, PiHole will spin back up.
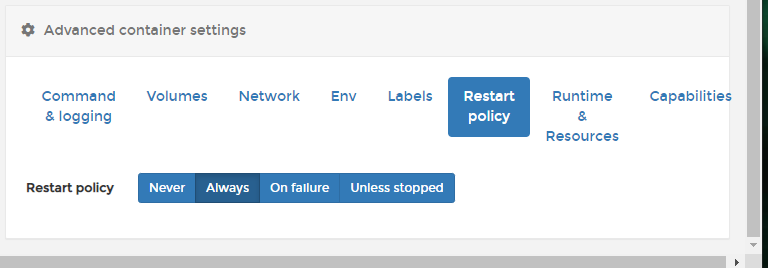 Portainer restart policy
Starting the container
After all that configuration, we can now start the PiHole service. Scroll up slightly and click the Deploy the container button.
 Portainer deploy the container
You’ll then see
Portainer deploy the container
You’ll then see Deployment in progress
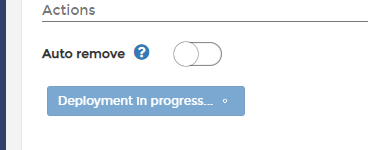 Portainer deployment in progress
This might take some time as it needs to pull down the PiHole image from the DockerHub.
Portainer deployment in progress
This might take some time as it needs to pull down the PiHole image from the DockerHub.
 Portainer starting container
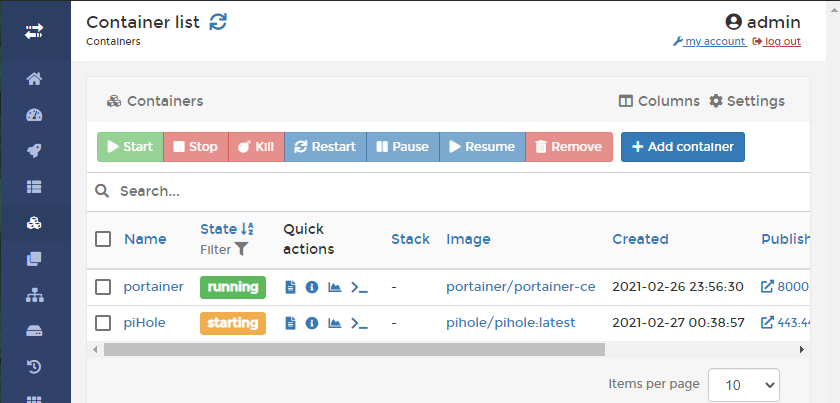
You’ll then be redirected back to the Container List page. You see that PiHole is now starting up. We can check the status of this by clicking on the logs icon.
Portainer starting container
You’ll then be redirected back to the Container List page. You see that PiHole is now starting up. We can check the status of this by clicking on the logs icon.
 Portainer logs button
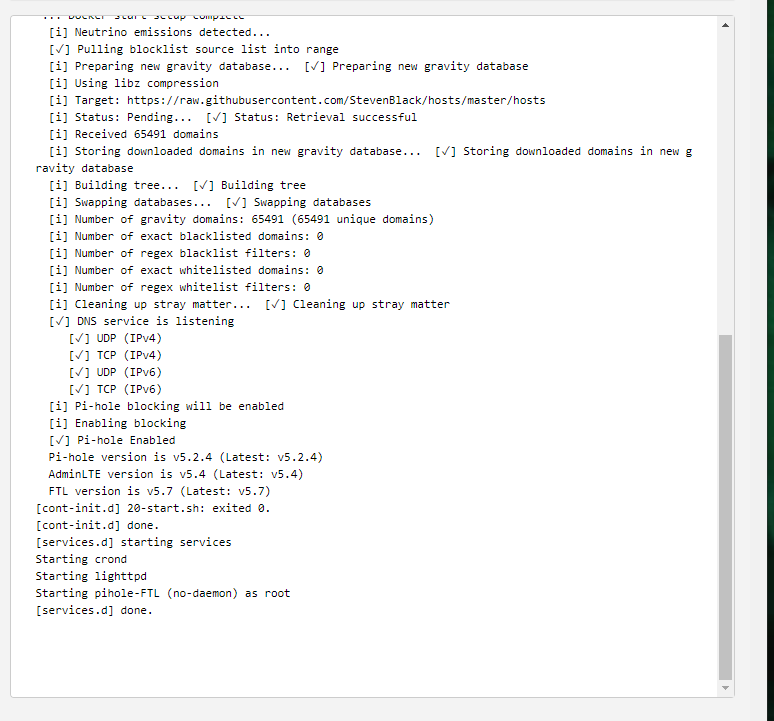
Still building..
Portainer logs button
Still building..
 Portainer container logs
Eventually, PiHole should spin up. You’ll see the following on your Container List page.
Portainer container logs
Eventually, PiHole should spin up. You’ll see the following on your Container List page.
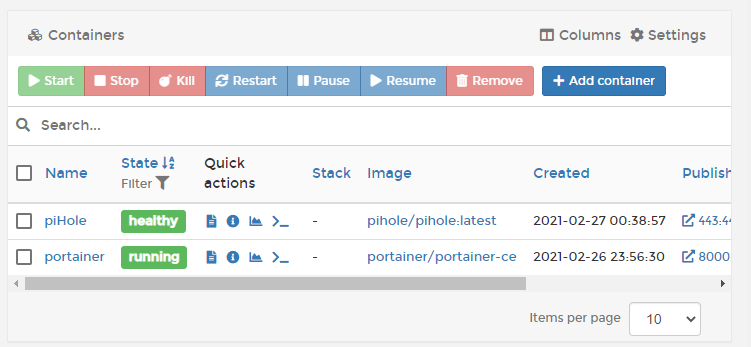 Portainer PiHole service running
You can now navigate to your server IP address.
Portainer PiHole service running
You can now navigate to your server IP address.
 PiHole admin
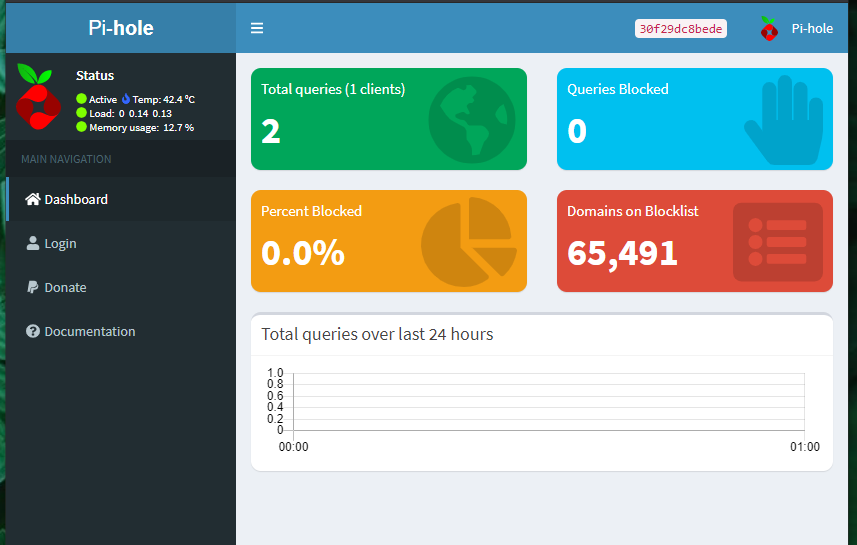 PiHole admin dashboard
Conclusion
That’s all there is to it. Hopefully, you can see the power of Portainer and how easy it is to configure Docker services on your instance. You now have an easy to use admin control panel for all of your services. Meaning that you can check the logs of your running containers, view the resources being used by each container. You could even set up an external endpoint for your Docker containers.
Please let us know if you get stuck along the way. We’re happy to help you out. This post contains affiliate links, meaning we may receive a small commission on purchases made through links in this post. At no extra cost to you 😊
We hate Ads! They don’t respect your privacy.
Would you consider supporting us on buy me a coffee? Your support really helps to keep the costs down with running the blog